I recently completed my project to turn an early 20th century sewing station into a 21st century internet station. I used sapele for this build (second only to walnut as my favorite handtool wood to work with). Here is some documentation so I don’t forget what I did.
Securing the cabinet to the cast iron base
I made a simple base from a scrap piece of bubinga I had laying around. It’s held in place by two walnut dowels I hand cut (pounded out with a dowel plate) to fit through the existing cast iron screw holes where the base of the old treadle was held in place with big screws. These dowels go through the screw holes and into the wood where I drilled some holes. My aim for this project was to complete it without any screws or other hardware, so these two dowels and two top dowels I document later are what keep in solidly locked in place.


Building the cabinet
I had to join two boards to have the width I needed for the base and sides.

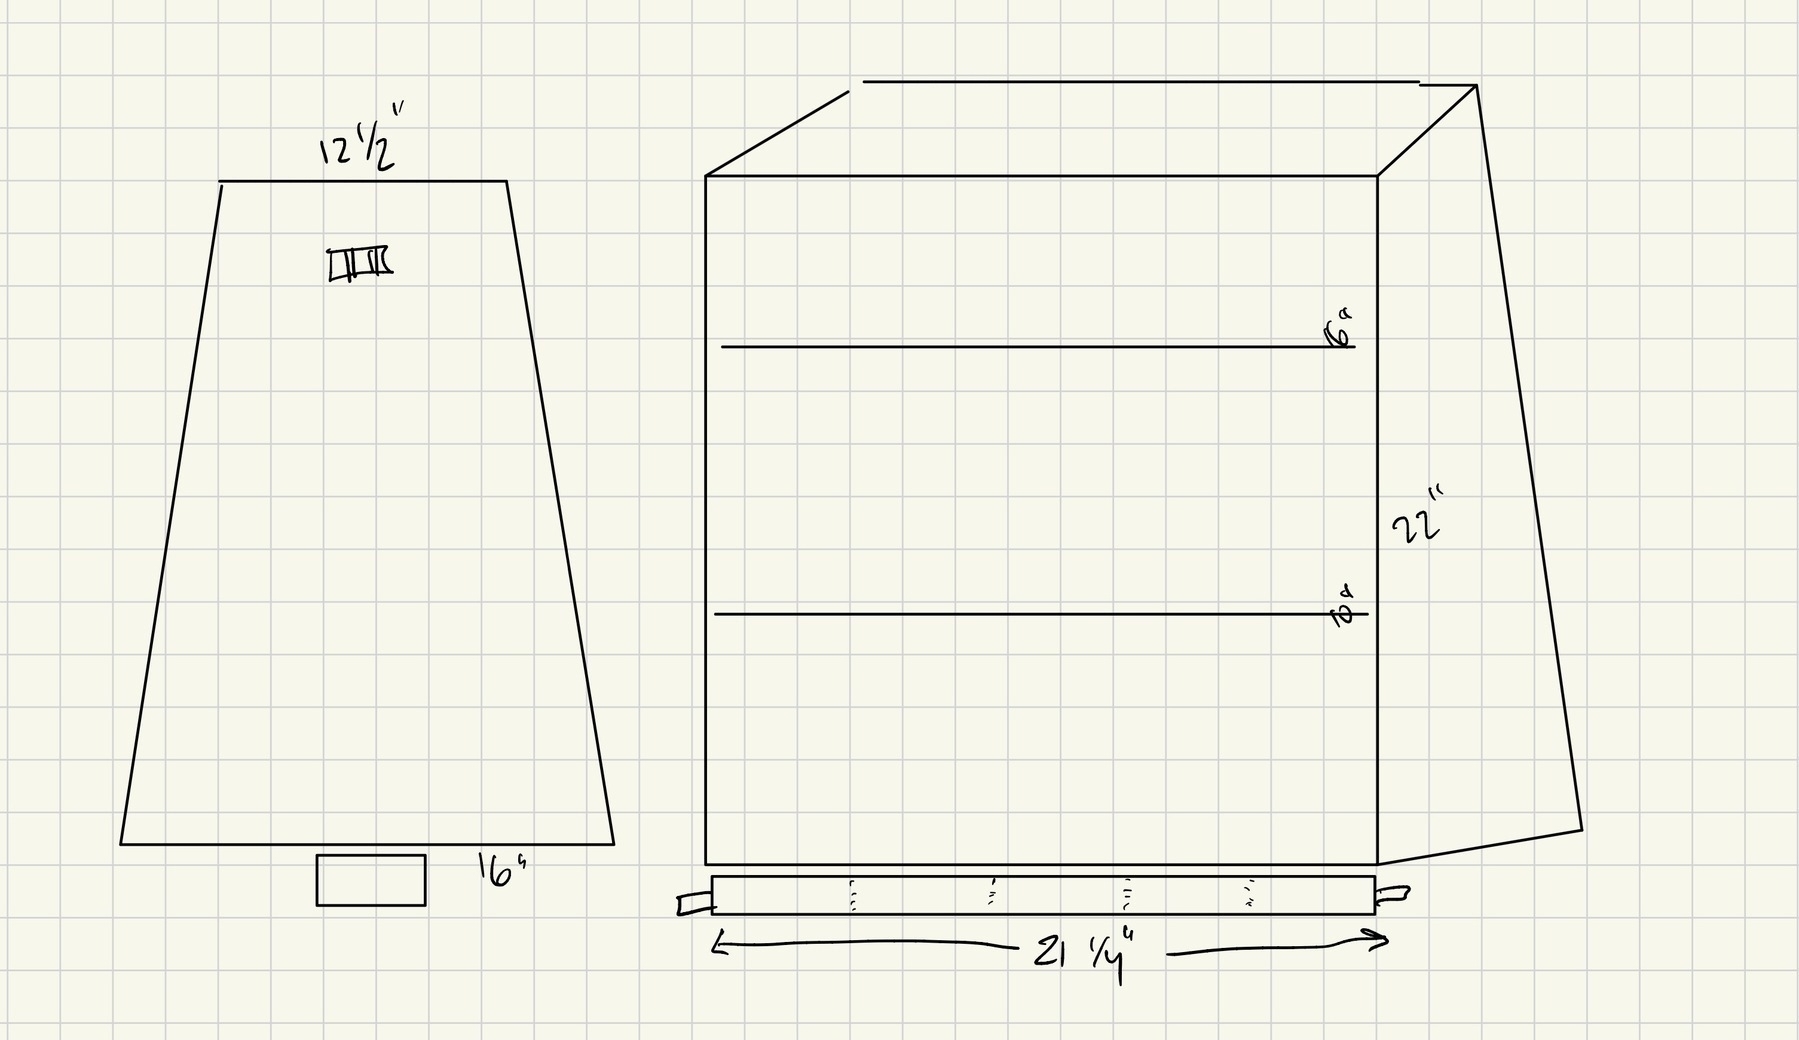
Each side was cut at angles to match the angle of the cast iron sewing machine table base.

The base of the cabinet was a simple square, thankfully no angles.

The sides were joined to the base with dovetails, I used a variable width just because I had never tried to do differing widths before. Turned out well.


This cabinet is for computer bits that get warm, so I wanted to maximize airflow, so I left the top open, held in place with two dovetailed arms in the front and back to keep it mechanically solid.

Here’s the first dry fit of the cabinet frame.

The innards
My design was for two shelfs to hold a wi-fi router, a 5-port ethernet switch, a Hue hub, a Synology, an outlet extender, and a big ol’ UPS power supply (I have 9 total items to plug in, including some equipment that will be placed on top of the table and on the floor next to this table), but I did not want to see a crapload of cables. So I decided to make an angled back panel to hide the UPS and cabling. Here’s what the inside of each side looked like before the cuts.

The shelf dadoes were easy enough to saw, chisel, and router out, but the angled grooves were a challenge. I couldn’t saw the edges of this groove given the length and angle (at least I couldn’t figure out how to do that), so I slowly and carefully cut out these angled grooves with my hand router. The angled grooves are cut to fit a 1/4 plywood back with some wiggle room (a bit wide).

I used the offcuts from the overhang of the shelfs shown here to use as supports in the back. These thin pieces are used to give me a place to attach ties to keep cables tied nicely up. I liked this solution because there was is no waste and the bars on back will serve a useful function.

Here’s a view of the back to see those offcuts in place.

I decided to use 1/4 plywood for the back angled panel — used mainly to hide cables. So I needed to make holes to pass the cables through. The first attempt at my plywood back failed. I hand chiseled out openings to run cables through. It came out nice, but after I completed it, I tripped after removing it and it snapped in half. Oof. So my second iteration was done using the only power tool in the project: I used a cordless drill and a Forstner bit to cut out six holes to run cables. This was a better solution, overall.

Putting it together
I drilled holes in the top of the cabinet so I could attach walnut dowels to hold the top in place, using the existing openings in the cast iron frame to keep each dowel locked in.

Here’s the dry fit. The medallion on the top shelf you can see below on the top shelf was mounted to the cast iron sewing machine; I was able to delicately remove it and place it here.

A close-up of the medallion, just because I think it’s cool. We lived in Kaiserslautern, Germany, for seven years (where we picked up this sewing machine table at a flea market), so this is a touch of something special for us to see this mounted here. We’ve been lugging this table around for about two decades, but never had space for it. I was about to give it away, when this project idea came into mind. I’m happy that I found a way to turn it into useful furniture.

I finished the cabinet with Osmo top-oil, because I’m lazy with finishing and like that I can just rub it on, it looks nice, and it dries fast.

The back of the cabinet, showing the slide-in 1/4 panel with holes for cables. I left this panel unglued so I can easily slide it in and out. This was a critical decision, as I aligned the holes so they were hidden behind the shelves, and a few of the cables I had to fit through were too fat to get past the shelves, so this made it easy to move it around to get cabling set up. The holes are also good to promote airflow, I figure, as well as the open top. I also may someday need to add more holes, so now that’s easy to do.

Finished build
Here’s what it looked like in place, without anything in it.

And here is the back that goes against a wall, with all the cabling hooked up. It ain’t pretty, but I don’t have to look at any of this, it’s all nicely hidden behind the panel.

And here is the finished piece in place and in use with all the gear hooked up and running. There are only two visible cables: (1) the power plugged into the wall that goes to the big UPS and a black ethernet cable that runs to my desktop computer so I can be hardwired. The ONT for my new fiber network enters the house and is mounted on the wall directly behind the sewing machine table. The cast iron well where the sewing machine was mounted on the top of the table is covered by the printer, but it’s holding a hidden Anker 5-port USB hub with the cables poking out behind the printer for charging various things. The shredder and a corner light behind the shredder on the floor, along with a HomePod on the desktop, are also all connected up here behind the table without any visible cables. I’m pleased with how it turned out.